Last month, with the help of some wonderful friends, I was in charge of a dinner for 225 women at church. Not only were we in charge of the menu, but we were also responsible for setting and decorating 29 tables with a very thin budget. We wanted to spend most of our money on the food, so I took this as an opportunity to destash from my personal supply of sewing goods. Our theme was fall - rustic colors and kraft paper. I had reels of old maroon cotton grosgrain ribbon and a big spindle of vintage kraft paper color rick rack. You would have thought sewing a zillion yards of rick rack on a zillion yards of ribbon would have been enough to satisfy my persnicketiness and limited budget, but no -- I wanted kraft paper bowls, too. We were setting out a snack on the tables and we wanted the containers to go with the theme... and cost nothing. Couldn't find them anywhere locally, so we made them.

I played and played with a pattern until we had a square-ish paper bowl. We lined them with waxed paper since our snack was buttery caramel corn. Yum. Anyway, the bowl. I thought I'd share how I made them on my blog. They can be made out of any fairly sturdy paper or even fabric as I will show.
Square Paper Bowl
Start out with paper approaching card stock weight. The bigger the bowl, the stiffer the paper needs to be. Mine are only about 4" across the top, so I used some turquoise star scrapbook paper and a chartreuse boomerang paper divider on the right.
Pattern
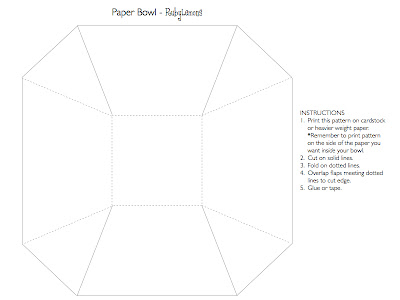
Here's the pattern in JPG format. It's faint so the lines aren't too noticeable when printed on the actual paper. You can lift the JPG right from my blog and enlarge or scale down as wanted for your bowl. Believe it or not, the time it took to get this pattern right, was way too long to admit.
Ideally, your paper should be two-sided like my chartreuse paper. If your paper is one-sided like my turquoise paper, you might want to spray glue two pieces back-to-back which would allow you to have a cool complementary color on the inside of your bowl.
My turquoise paper was one sided, so I decided to spray glue it to a piece of fabric. First I really starched and ironed the piece of 50s cotton fabric. Then using 3M Super 77, I sprayed the back of the paper...
...and smoothed it onto the back of the fabric.
Cut out on solid lines.
I used a glue runner to affix the flaps.
Overlap the flaps to the dotted lines. After the flaps are fastened, you can gently bend or fold the corners and bottom on the dotted lines.
Cute and modern.
Perfect for little snacks or mints or rings or supplies or you name it. You can coordinate with any decor you wish to match. There are no limits with all the paper and fabric out there.


