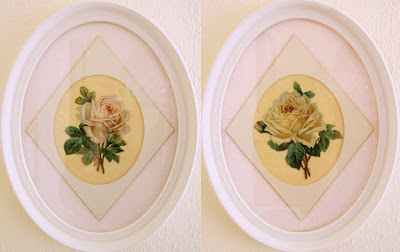
I was recently contacted by Carly, the daughter of a friend who told me she was obsessed with some roses I framed a while back that her mother now owned.
What I would consider very shabby chic, they were made from diamond cutting some reclaimed oval mats and mounting them onto a pink ground with very antique repainted oval frames. In the center of it all were some 100 year old embossed Victorian die cuts. Scrapbooking had another heyday in the late 1800s and these bits of ephemera were all the rage for scrapbookers back then.
Carly considered making these disappear from her mother's home, but instead thought she should contact me and find out where she could get roses like that. After a brief email discussion, we decided if Carly could find some die cut flowers and frames she liked (I steered her to Etsy), I would put something together for her.
She choose these die cuts from Vintage Cornucopia on Etsy.
We chose these oval frames. I suspect these were from the 60s-70s when the gold trimmed French provincial bedroom furniture was popular... and yes, that was my bedroom furniture as a teenager.
The flowers arrived. The frames arrived.
Oh this little Louis XV fancy lad sitting on a white stump soliciting the large vase of flowers sure looks French provincial, doesn't he? I wonder more about why someone would paint a picture of a little man proposing to a vase of flowers...
Surprise, surprise... the "mat" was painted on the glass!
Easily removed with a razor blade.
A bit of sanding was in order before painting.
I put a few wood screws lightly in the back to raise them off the table for painting. (I've since heard that push pins would work as well - great idea!)
Custom matched the paint to the fabric.
The fabric. I wanted to find something fresh like a damask, trellis or suzani but to no avail. When I saw these perfectly colored dots in the decorator fabric at JoAnn's, the decision was made.
Using a drafting compass, I marked the lines of the mat about two inches in from the frame edge and cut out the oval with an exacto knife. It doesn't have to be a perfectly cut mat because it will be covered... but make the shape right even if you have to sand out bumpy imperfections with a paper nail file or fine sandpaper. (My red lines are for lining up the fabric once the mat was sprayed. I wanted the dots placed the same for each mat.)
Spray glue the mat board and place on your fabric. Cut the fabric at least a half inch bigger than the mat board. For wrapping the fabric around the mat, notch at half inch to one inch intervals depending on the curve of the oval. Closer for the tighter curves and farther apart for the straightaways. Cut 1/4 - 1/8th inch away from the mat.
Fold over a couple of tabs at a time with a light touch of hot glue.
With clean hands, press the fabric over tightly.
Fabric covered oval mats are ready.
Think of the possibilities - a scalloped mat would be cute.
Frame them up.
Add a fun backing paper (wrapping paper).
Who wants plain ol' brown bag craft paper anyway?
The framed roses are complete.
I hope Carly likes them as much as her mother's!
Update: check out how they look in Carly's kitchen.
Update: check out how they look in Carly's kitchen.


